Noma ET525C Timer Instructions: Setting Up Your Outdoor Timer
In today’s fast-paced world, convenience and automation are key. When it comes to managing your outdoor lighting and electrical devices, the Noma ET525C Timer offers a user-friendly solution. This article will guide you through the step-by-step instructions to set up and utilize the Noma ET525C Timer effectively. Say goodbye to manually switching your outdoor lights and hello to a hassle-free, automated experience.
Introduction
The Noma ET525C Timer is a versatile device designed to simplify your outdoor lighting and electrical control. Whether you want your garden lights to turn on automatically at dusk or your festive decorations to sparkle throughout the evening, this timer has got you covered. Let’s get started with setting it up!

Unboxing Your Noma ET525C Timer
Upon opening the package, you will find your Noma ET525C Timer, a user manual, and a set of accessories. Ensure that all components are present and undamaged before proceeding.
Understanding the Components
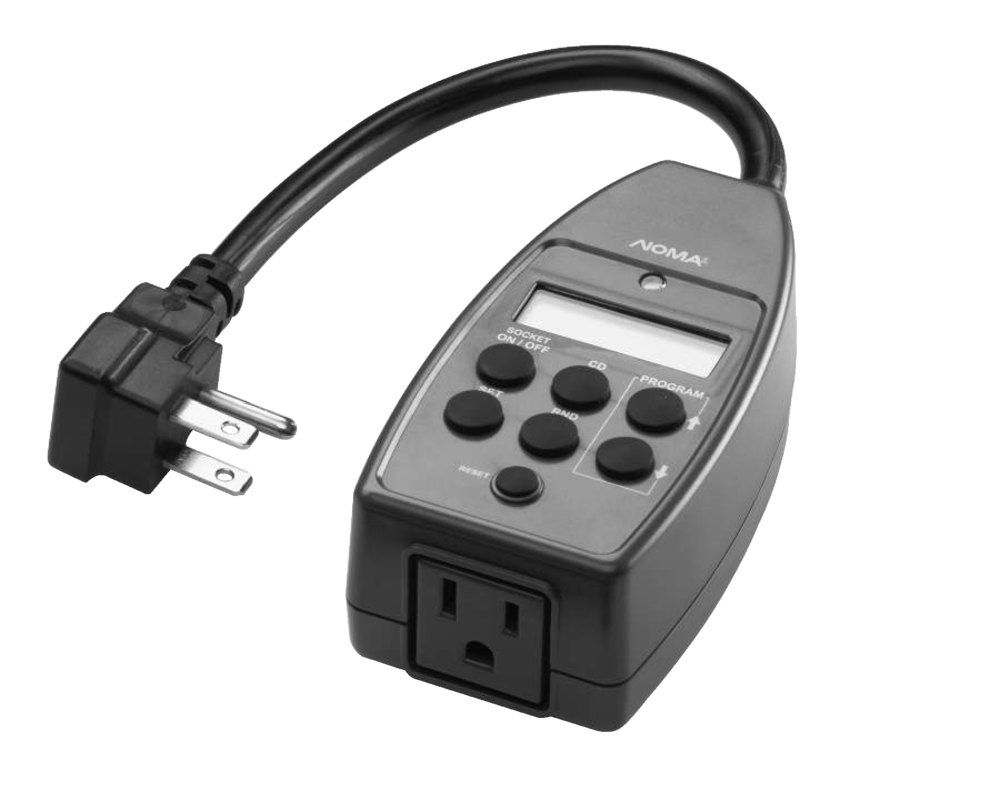
Before diving into setup, familiarize yourself with the timer’s components:
- Timer Unit: The main control unit with an easy-to-read LCD screen.
- Outlet Covers: Protective covers for the timer’s outlets.
- Manual Override Button: Allows you to override programmed settings.
- Power Cord: Connects the timer to a power source.
- Stake: For secure placement in your outdoor area.
Initial Setup
4.1. Setting the Current Time
- Plug the Noma ET525C Timer into a power source.
- The LCD screen will display the default time. To set the current time, press the “Clock” button.
- Use the arrow buttons to adjust the hour and minute settings.
- Press “Enter” to confirm.
4.2. Selecting Your Time Zone
- Press the “TZ” button to select your time zone.
- Scroll through the available time zones using the arrow buttons.
- Press “Enter” to confirm your selection.
Programming Your Timer
5.1. Setting Daily On/Off Times
- Press the “Prog” button.
- Select the day(s) you want to program (e.g., Monday to Sunday).
- Set the desired on and off times for each selected day.
5.2. Utilizing Random Mode
Random mode adds a layer of security by turning your lights on and off at irregular intervals, making it appear as if someone is home.
- Press the “Rnd” button.
- Set the duration of random mode operation.
5.3. Weekly Schedules
Create custom schedules for specific days or occasions. Simply follow the steps in section 5.1, selecting the desired days and times.
Manual Override
In case you need to manually control your devices, press the “Manual” button. This will override the programmed settings until the next scheduled event.
Troubleshooting Tips
Encountering issues with your Noma ET525C Timer? Refer to the troubleshooting section in the user manual or visit the manufacturer’s website for additional support.
Maintenance and Care
To ensure the longevity of your timer, keep it clean and protected from extreme weather conditions. Regularly check the power cord for any damage.
Safety Precautions
- Always place the timer on a stable surface.
- Keep the timer away from water sources.
- Ensure that your connected devices do not exceed the timer’s load capacity.
Benefits of Using the Noma ET525C Timer
The Noma ET525C Timer offers several benefits, including energy conservation, added security, and the convenience of automated outdoor lighting control. Say goodbye to wasting energy and hello to a more efficient, eco-friendly home.
FAQs
11.1. How do I reset the timer?
To reset your Noma ET525C Timer, press and hold the “Reset” button for 5 seconds. This will clear all programmed settings.
11.2. Can I use this timer for indoor devices?
The Noma ET525C Timer is designed for outdoor use. For indoor devices, consider using a suitable indoor timer.
11.3. What is the maximum load capacity of the Noma ET525C?
The timer has a maximum load capacity of [check user manual for specific load capacity] watts. Ensure that your connected devices do not exceed this limit.
11.4. How do I replace the backup battery?
Refer to the user manual for instructions on replacing the backup battery.
11.5. Can I use this timer in extreme weather conditions?
While the Noma ET525C Timer is designed for outdoor use, it is advisable to protect it from extreme weather conditions to ensure its longevity.
Conclusion
The Noma ET525C Timer offers a convenient and efficient way to manage your outdoor lighting and electrical devices. With easy setup and multiple programming options, you can enjoy the benefits of automation while enhancing energy conservation and security. Say goodbye to manual control and embrace the future of outdoor device management with the Noma ET525C Timer.

Maximizing Efficiency with Xantrex High-Frequency Inverters: A Comprehensive Guide
In the world of power conversion, Xantrex stands as the unrivaled leader in high-frequency inverter design. This article will guide you through the essential steps for seamlessly connecting your inverter, highlighting insights from page 14 of the instruction manual. Additionally, we will delve into optimizing your power source by discussing how to initiate your vehicle to charge the battery effectively.
The Motomaster Eliminator 300W Power Box Charger with Inverter
In the heart of Central Ottawa, nestled within Greenbelt Gatineau, the Motomaster Eliminator 300W Power Box Charger with Inverter takes center stage. Unlocking its potential requires a profound understanding of its intricate wiring system. To aid you in this journey, we have provided a Single Drum Roller Wiring Diagram and a Hydraulic Diagram Manual for your convenience.
Power Inverter Specifications
Before we dive into the nitty-gritty of connecting your inverter, let’s review the specifications of the Motomaster Eliminator 300W Power Box Charger with Inverter:
- Continuous Power: 300W
- Surge Peak Power: 600W
Off-Grid Solar System Integration
For those seeking sustainable power solutions, the integration of an off-grid solar system is paramount. Our guide will walk you through the steps required for a 1KW PV system. Additionally, we offer insights on obtaining the necessary equipment, including an inverter for your air conditioning system. Please note that while we provide valuable information, we strongly advise consulting with a certified electrician and adhering to the manufacturer’s manual for precise instructions.
DIY Wiring Diagrams
Empower yourself with the knowledge to install and configure your power system efficiently. Our comprehensive DIY wiring diagrams cover kits ranging from 100W to 800W, ensuring that you have the resources to tailor your setup to your specific needs. To further assist you, we’ve included a product list with associated costs for a transparent and budget-conscious approach.
Troubleshooting Your Power Inverter
Power Pete, our resident expert, is here to address all your power inverter-related queries. While every inverter comes with a helpful manual, questions may still arise during the installation or operation. In this section, we will explore common issues and solutions, ensuring that your power system runs smoothly.
Motomaster Manual Insights
It’s worth noting that a significant portion of the Motomaster manual closely mirrors the Xantrex manual. This similarity emphasizes the quality and reliability of the information you’ll find within these manuals. If you own a 300W Pure Sine Wave (PSW) inverter, you can trust the guidance provided to be consistent across both manuals.
Understanding Low Battery Alarms
One of the most common concerns users face is the beeping sound emitted by their inverters. In many cases, this sound serves as an alert for low battery conditions. Understanding the nuances of these alarms is crucial, as it can provide valuable insights into the health of your power system. We delve deeper into the significance of these alarms and how to address them effectively.
Intelligent Battery Charger with Digital Technology
For those seeking an intelligent battery charging solution, Motomaster offers advanced technology in their chargers. Our guide provides a detailed overview of these chargers, ensuring you harness their capabilities to the fullest extent.
Troubleshooting Inverter Faults
When the red fault light on your power inverter illuminates, it’s a clear indication that something isn’t functioning correctly. In this section, we explore the common issues that can trigger this fault signal. Voltage fluctuations, both high and low, are often the culprits behind these problems, and we’ll guide you on how to address them.
Small Inverters with Cigarette Lighter Adapters
Many small inverters, typically rated at 400 watts or less, come equipped with a convenient cigarette lighter adapter for on-the-go power. We discuss the advantages and limitations of these inverters, ensuring you make an informed choice for your power needs.
Dual USB Car Adapters
If you’re looking to charge your devices on the road, we also cover dual USB car adapters as an efficient solution. Learn how to select the right adapter for your requirements and how to use it effectively.
Inverter Kit Contents
Each inverter kit includes specific components and instructions. We provide an overview of what you can expect in your kit, along with clear instructions on connecting and utilizing these components to harness the full potential of your power inverter.
Conclusion
In this comprehensive guide, we’ve explored the world of power inverters, focusing on the Motomaster Eliminator 300W Power Box Charger with Inverter. Armed with this knowledge, you’ll be better equipped to install, troubleshoot, and maximize the efficiency of your power system. Remember, safety should always be a top priority when working with electricity, so consult a professional if you have any doubts or concerns.