A3120 Circuit Diagram

A3120 Circuit Diagram: Unveiling the Secrets of this Essential Component

In the world of electronics, circuit diagrams are the unsung heroes that help engineers and hobbyists bring their innovative ideas to life. Among the many components used in these diagrams, the A3120 circuit is a crucial element that plays a significant role in ensuring proper functionality. In this comprehensive guide, we will delve deep into the A3120 circuit diagram, exploring its intricacies, applications, and the importance of understanding its layout.

Introduction

The A3120 circuit diagram is a critical component in the world of electronics, known for its ability to provide electrical isolation and high-speed switching. In this article, we will explore the intricacies of this component, its applications, and how to effectively decipher its diagram.

What is the A3120 Circuit?

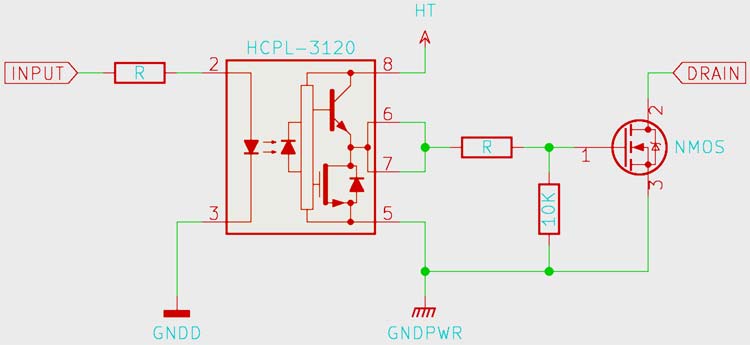
The A3120 circuit, also known as an optocoupler, is an integrated circuit designed for high-speed digital interface applications. It consists of an LED (Light Emitting Diode) and a phototransistor enclosed in a light-sensitive package. This component is used to transmit signals between two electrically isolated circuits.

Components of the A3120 Circuit

Continue reading

And gate ic number

Unlocking the Secrets of AND Gate IC Numbers: A Comprehensive Guide

Introduction

In the ever-evolving world of electronics, understanding the intricate details of integrated circuits (ICs) is essential. Among the myriad of ICs, the AND gate IC number holds a pivotal role. This article aims to demystify the AND gate IC numbers, providing you with a comprehensive understanding of their significance, applications, and more.

What is an IC?

Before delving into the specifics of AND gate IC numbers, let’s first clarify what an integrated circuit is. An integrated circuit, often referred to as an IC or microchip, is a tiny electronic device that contains a multitude of interconnected electronic components, such as transistors, resistors, and capacitors, all etched onto a single semiconductor chip. ICs serve as the building blocks of modern electronic devices, ranging from smartphones to computers and beyond.

The Fundamentals of AND Gates

To comprehend AND gate IC numbers, we must first grasp the basic concept of AND gates. An AND gate is a fundamental digital logic gate that performs a logical conjunction operation. It has two inputs and produces a single output, which is only “true” (or “high”) when both inputs are also “true.”

How AND Gates Work

Imagine two switches, A and B. To activate a light bulb, both switches must be in the “on” position. Similarly, an AND gate outputs a “high” signal only when both of its inputs are also “high.” If either input is “low,” the AND gate’s output will be “low.”

AND Gate IC Numbers Decoded

Now that we have a clear understanding of AND gates, let’s delve into the world of AND gate IC numbers.

What are AND Gate IC Numbers?

AND gate IC numbers, also known as IC part numbers or identifiers, are alphanumeric codes used to distinguish different types and variations of AND gate integrated circuits. These codes are essential for electronics engineers and enthusiasts when selecting the appropriate IC for a specific application.

Continue reading

Ci chargemaster mk5

The Ultimate Guide to Ci Chargemaster MK5: Unleash the Power of Charging Efficiency

In this digital age, where we rely on an ever-increasing number of electronic devices, having a reliable and efficient charging solution is paramount. The Ci Chargemaster MK5 is a game-changer in the world of charging technology, offering an array of features that can revolutionize the way you power up your devices. In this comprehensive guide, we will delve into the world of Ci Chargemaster MK5, exploring its features, benefits, and how it can simplify your life.

Introduction

In a world where our lives are intertwined with technology, finding the perfect charging solution can be a game-changer. The Ci Chargemaster MK5, with its innovative features and cutting-edge technology, promises to make your charging experience smoother, faster, and more efficient than ever before. But what exactly is Ci Chargemaster MK5, and how can it benefit you? Let’s dive in.

Understanding Ci Chargemaster MK5

What is Ci Chargemaster MK5?

Ci Chargemaster MK5 is a state-of-the-art charging solution designed to cater to the diverse needs of modern consumers. It combines speed, safety, and versatility to provide a superior charging experience for your smartphones, tablets, laptops, and other electronic devices.

Continue reading

Woods 15 Amp Timer Instructions

Woods 15 Amp Timer Instructions: Simplifying Your Electrical Control

In a world increasingly dominated by technology, the need for effective time management has never been greater. Whether it’s for your outdoor lighting, holiday decorations, or household appliances, the Woods 15 Amp Timer is a reliable solution to help you schedule your electrical devices. In this comprehensive guide, we will delve into the details of Woods 15 Amp Timer instructions, ensuring you can harness its full potential to make your life more convenient and efficient.

Introduction: Embracing the Woods 15 Amp Timer

The Woods 15 Amp Timer is a versatile tool designed to simplify your electrical control needs. Whether you want your outdoor lights to turn on at dusk and off at dawn, or you want to automate your home appliances to save energy, this timer has you covered. Let’s explore how to make the most of it.

Unboxing and Initial Setup

Before we dive into the detailed instructions, it’s essential to know what comes in the box. Typically, you will find the Woods 15 Amp Timer, an instruction manual, and a battery. The timer requires a battery to maintain its settings during power outages, so ensure it’s properly installed before you proceed.

Setting the Current Time

Setting the current time on your Woods 15 Amp Timer is the first step towards effective automation. Here’s how you can do it:

Continue reading

Kingshield 7 day timer instructions

Mastering Your Kingshield Day Immersion Heater Timer: A Comprehensive Guide

In the world of home appliances, the Kingshield Day Immersion Heater Timer is a game-changer. This handy device offers precise control over your immersion heater, making it incredibly efficient and convenient. If you’ve recently acquired one of these timers and are looking for clear instructions on how to make the most of it, you’re in the right place. In this guide, we’ll walk you through setting up and operating your Kingshield Day Immersion Heater Timer like a pro.

Setting the Current Time and Day

The first step in harnessing the power of your Kingshield Day Immersion Heater Timer is to set the current time and day. Follow these steps for a seamless setup:

  1. Accessing the T106-C Timer: Begin by locating your T106-C timer. If you need assistance finding it, refer to the user manual.
  2. Operating Instructions: Once you have your timer in hand, it’s time to dive into the operating instructions. We’ll ensure that you have a clear understanding of the process.

Understanding Your Kingshield Timer

Before we delve into the setup process, let’s take a moment to understand the features of your Kingshield timer:

  • Manual Override Facility: The Kingshield Day Immersion Heater Timer comes equipped with a manual override facility, giving you full control whenever you need it.
  • Compact Programmable Plug-in Timer: This timer is designed to be compact and user-friendly. It’s perfect for controlling lights, lamps, fans, holiday decorations, and more.
  • Custom Scheduling: Want your fans on during the day and off at night? With the Kingshield timer, you can create custom schedules tailored to your needs.
Continue reading

Lap Immersion Timer Instructions

Lap Immersion Timer Instructions: Dive into Precision and Efficiency

In today’s fast-paced world, precision and efficiency are paramount, even when it comes to something as simple as timing your laps during a swim. Lap immersion timers have become an indispensable tool for swimmers of all levels, from beginners to professionals. In this comprehensive guide, we will walk you through the ins and outs of lap immersion timer instructions, ensuring that you get the most out of this essential swim accessory.

Getting Started with Your Lap Immersion Timer

Before you dive into the pool, it’s crucial to familiarize yourself with your lap immersion timer and its functions. Here’s a step-by-step guide to get you started:

1. Unboxing Your Lap Immersion Timer

Begin by carefully unboxing your lap immersion timer. Inside the package, you’ll typically find the following components:

  • The lap immersion timer device
  • Instruction manual
  • Batteries (if not already installed)
  • Mounting accessories (if applicable)
Continue reading

Difference between HRC and HBC Fuse

Difference between HRC and HBC Fuse: Ensuring Electrical Safety

Introduction

When it comes to ensuring electrical safety, fuses play a crucial role in protecting our homes, appliances, and electrical systems. Two commonly used types of fuses are High Rupture Capacity (HRC) and High Breaking Capacity (HBC) fuses. While they might sound similar, they serve distinct purposes and have unique characteristics. In this article, we will delve into the differences between HRC and HBC fuses, helping you make informed choices for your electrical needs.

Understanding Fuses and Their Importance

Before we dive into the specifics of HRC and HBC fuses, let’s start by understanding the fundamental concept of fuses and why they are essential for electrical systems.

High Rupture Capacity (HRC) Fuse

What is HRC Fuse?

The HRC fuse, short for High Rupture Capacity fuse, is designed to withstand high levels of fault current. Its primary function is to protect electrical circuits from short-circuits and overloads.

Key Features of HRC Fuses

  • Robust Construction: HRC fuses are built to be sturdy and durable, capable of withstanding the intense heat generated during a fault.
  • Fast Acting: These fuses react swiftly to excessive current, minimizing the risk of damage to the electrical system.
  • Wide Range of Applications: HRC fuses are suitable for various industrial and commercial applications due to their high rupture capacity.
Continue reading

How to program noma timer

How to Program Noma Timer: A Step-by-Step Guide for Efficiency

In today’s fast-paced world, time management has become crucial. Whether it’s for your home or workplace, having the ability to automate tasks can save you both time and effort. One such device that can help you with this is the Noma Timer. In this comprehensive guide, we will walk you through the process of programming a Noma Timer to make your life easier and more efficient.

1. Introduction to Noma Timer

The Noma Timer is a versatile electronic device designed to automate various tasks such as turning on and off lights, appliances, and outdoor equipment. It is a handy tool for homeowners, gardeners, and businesses looking to enhance their energy efficiency and convenience.

2. Unpacking and Understanding the Timer

Before diving into programming, it’s crucial to understand your Noma Timer fully. Begin by unpacking the timer and familiarizing yourself with its components, including the LCD screen, buttons, and power source.

3. Setting Up the Noma Timer

To start using your Noma Timer, you need to set it up correctly. This involves inserting the batteries, connecting it to the device you wish to control, and ensuring it’s in a location where it can receive signals effectively.

4. Programming the Timer

4.1. Date and Time Configuration

The first step in programming your Noma Timer is setting the date and time. This is essential for scheduling tasks accurately. Refer to the user manual for step-by-step instructions on how to do this.

Continue reading

Mechanical minimizer test

Mechanical Minimizer Test: Unlocking Efficiency in Machinery

Introduction

In the world of engineering and mechanics, optimizing efficiency is paramount. The mechanical minimizer test is a critical tool that engineers and manufacturers utilize to enhance the performance of various mechanical systems. In this comprehensive guide, we will delve into the intricacies of the mechanical minimizer test, exploring its purpose, methodology, and the significant impact it has on the world of machinery. So, let’s dive in!

Understanding the Mechanical Minimizer Test

What is the Mechanical Minimizer Test?

The Mechanical Minimizer Test, often referred to as MMT, is a crucial evaluation process used to minimize inefficiencies in mechanical systems. This test primarily focuses on improving the overall performance of machinery and equipment, making them more energy-efficient and reliable.

The Significance of Efficiency

Efficiency in machinery is a key factor that directly affects operational costs, environmental impact, and productivity. By enhancing efficiency, manufacturers can reduce energy consumption, extend the lifespan of machinery, and reduce downtime for maintenance.

The Working Principle

Identifying Inefficiencies

The first step in the mechanical minimizer test is to identify areas of inefficiency within a mechanical system. This involves a thorough inspection and analysis of the machinery’s components, including motors, gears, and bearings.

Continue reading

Lap mechanical 24hour immersion timer instructions

Lap Mechanical 24-Hour Immersion Timer Instructions

In today’s fast-paced world, managing our time efficiently has become crucial. Whether you’re a busy professional juggling work tasks or a homemaker trying to keep up with household chores, having a reliable timer can be a lifesaver. The Lap Mechanical 24-Hour Immersion Timer is a versatile tool that can help you streamline your daily activities. In this article, we’ll provide you with a comprehensive guide on how to use this timer effectively. Let’s dive in!

Introduction to Lap Mechanical 24-Hour Immersion Timer

The Lap Mechanical 24-Hour Immersion Timer is a user-friendly device designed to assist you in managing your time efficiently. Whether you need it for cooking, exercising, or any other timed activity, this timer has got you covered.

Unboxing and Initial Setup

Upon unboxing, you’ll find the Lap Mechanical 24-Hour Immersion Timer along with a user manual. The initial setup is a breeze, and it won’t take long before you start using the timer to your advantage.

Understanding the Timer Display

Before we delve into the setup process, it’s essential to understand the timer’s display. Familiarize yourself with the layout, including the hours and minutes indicators, to navigate effortlessly.

Setting the Timer

Step 1: Power On

To get started, press the power button located on the timer’s front panel. You’ll see the display light up, indicating that the timer is ready for configuration.

Continue reading