Dicktator Wiring Diagram for Toyota 16V: A Comprehensive Guide
Introduction
In the world of automotive enthusiasts, having a clear and concise wiring diagram is essential. When it comes to Toyota 16V engines and the Dicktator engine management system, understanding the intricacies of the wiring is crucial. This article will serve as your ultimate guide, breaking down the Dicktator wiring diagram for Toyota 16V step by step.
Why Wiring Matters
Before we dive into the nitty-gritty of the wiring diagram, let’s understand why it’s so important. Proper wiring ensures that all electrical components of your Toyota 16V engine work harmoniously. A well-maintained wiring system can enhance engine performance, fuel efficiency, and overall reliability.
Getting Started: Basics of Dicktator Wiring
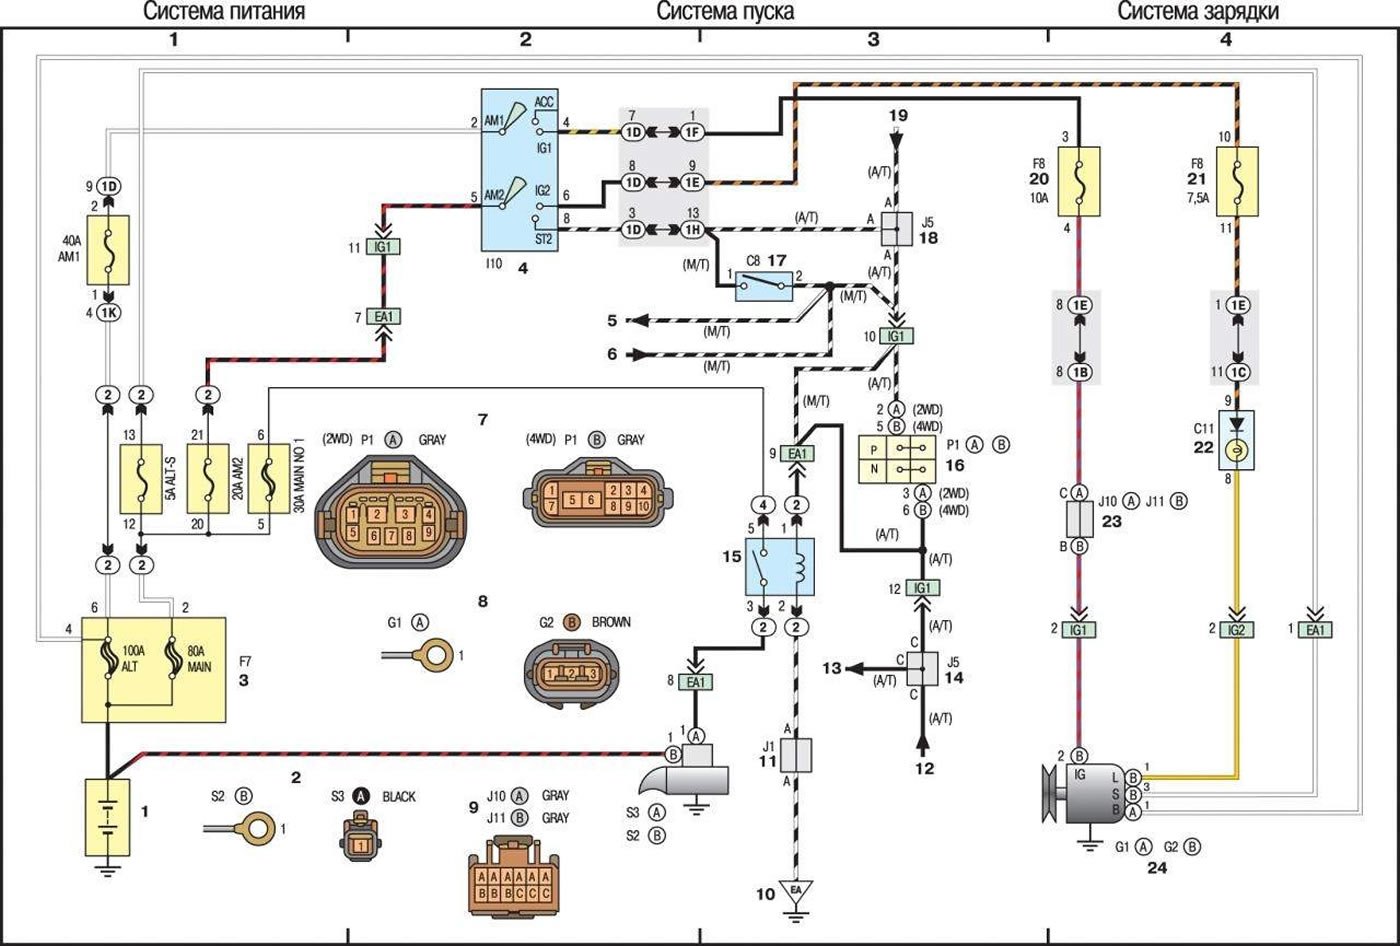
1. Understanding the Components
To begin, let’s familiarize ourselves with the key components involved in the Dicktator wiring diagram:
- ECU (Engine Control Unit): The brain of your engine management system.
- Sensors: Including the crankshaft position sensor, camshaft position sensor, and various others.
- Injectors: Responsible for delivering fuel to the engine.
- Coils: Essential for ignition.
- Wiring Harness: The interconnected web of wires linking everything together.
2. Wiring Color Codes
Knowing the wiring color codes is fundamental. It ensures that you connect the right wires to the right components. Here are some common color codes used in Dicktator wiring:
- Red: Power supply
- Black: Ground
- Green: Signal or sensor inputs
- Blue: Injector outputs
- Yellow: Ignition outputs
Building the Wiring Diagram
Now, let’s delve into creating your Dicktator wiring diagram for the Toyota 16V engine. It’s essential to be meticulous to prevent any mishaps.
3. Start with the ECU
Begin by locating the ECU and understanding its pin layout. Each pin corresponds to a specific function. Ensure that you connect the power, ground, and data wires correctly.
4. Sensor Connections
Connect your sensors, such as the crankshaft and camshaft position sensors, following the color-coded wires. Pay close attention to the sensor placement and orientation.
5. Injector Wiring
Properly wire the injectors, ensuring they are synchronized with the engine’s firing order. Misalignment here can lead to serious performance issues.
6. Ignition System
Connect the ignition coils to the ECU and power source. Ensure that the timing is set correctly to prevent misfires.
Testing and Troubleshooting
7. Preliminary Checks
Before firing up the engine, perform thorough continuity tests to ensure all connections are secure.
8. Using a Multimeter
A multimeter can be your best friend during this process. Test voltages, resistances, and signals to identify any discrepancies.
9. Diagnosing Issues
In case of any problems, utilize the Dicktator manual and the Toyota 16V service manual for troubleshooting guidance. This will help you pinpoint and resolve issues effectively.
Conclusion
A well-executed wiring diagram is the backbone of a smoothly running Toyota 16V engine equipped with a Dicktator system. Understanding the intricacies and following the color codes is vital for a successful installation. Remember, attention to detail and careful testing can save you from costly repairs down the road.
Frequently Asked Questions (FAQs)
- What is the role of the ECU in a Dicktator wiring system?
- The ECU (Engine Control Unit) manages and controls various engine functions, such as fuel injection, ignition timing, and emissions, to optimize performance.
- Why is proper wiring essential for my Toyota 16V engine?
- Proper wiring ensures that all engine components communicate effectively, leading to improved performance, fuel efficiency, and reliability.
- Can I install a Dicktator system on my Toyota 16V engine myself?
- While it’s possible, it’s recommended to seek professional assistance to ensure a correct and safe installation.
- What are the consequences of incorrect wiring in a Dicktator system?
- Incorrect wiring can lead to engine misfires, poor performance, and even irreversible damage to engine components.
- Where can I find additional resources for Dicktator wiring diagrams and Toyota 16V engine information?
- You can refer to online forums, automotive manuals, or seek guidance from experienced mechanics and enthusiasts.
Optimizing PIN Plug Layout for Enhanced Performance
In the realm of automotive performance, every detail matters. When it comes to optimizing your vehicle’s PIN plug layout, it’s essential to ensure that your wiring is as efficient as possible. In this article, we’ll delve into the intricacies of PIN plug layout from the harness side and explore ways to make the most out of it. Let’s get started!
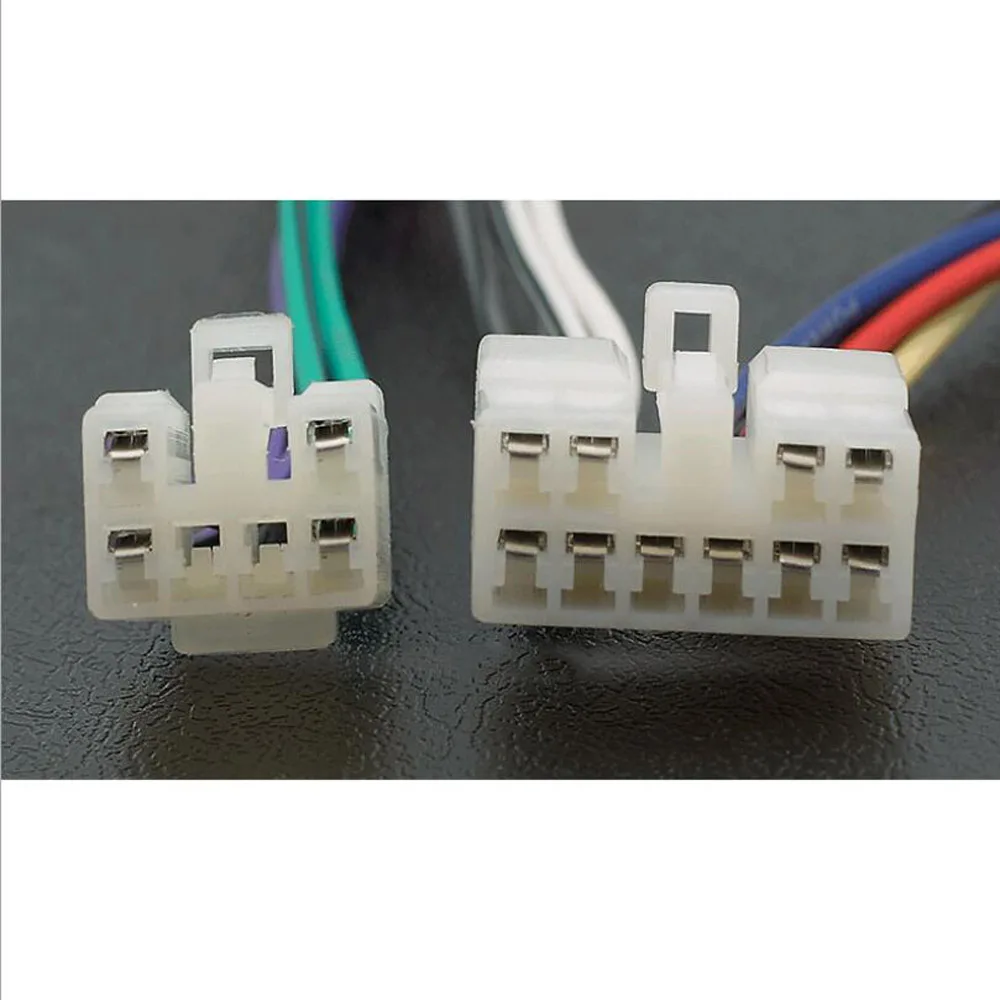
Understanding Multi-Colored Wires on the Harness Side
When examining the PIN plug layout from the harness side, you’ll likely come across an array of multi-colored wires. These wires play a crucial role in your vehicle’s performance, particularly in communicating with the Engine Control Unit (ECU). They serve as the conduit for vital information, such as signaling the ECU when the ignition coil has discharged.
Key Considerations for PIN Plug Layout Optimization

1. Ignition Off is the First Step
Before embarking on any PIN plug layout optimizations, it’s imperative to ensure that the ignition is switched off. This precautionary step ensures your safety while working on the wiring harness.
2. Disconnecting the Electrical Connector
To gain access to the PIN plug layout, you’ll need to disconnect the electrical connector. This step allows you to inspect and make necessary adjustments to the wiring.
Dicktator Management Installation: A Comprehensive Guide
If you’re dealing with an MP computer box and wiring harness, Dicktator management installation becomes a significant consideration. To navigate this process effectively, follow these steps:
1. Read the Manual
Begin by thoroughly reading the Dicktator management manual. Understanding the system’s intricacies is crucial for successful installation.
2. Study the Wiring Diagram
Next, study the wiring diagram provided in the manual. Familiarize yourself with the connections and pathways to ensure a seamless installation.
3. Apply Your Knowledge
With a solid understanding of the manual and wiring diagram, it’s time to apply your knowledge. Carefully make the necessary connections following the guidelines provided.
Exploring Wiring Diagrams for Clarity
Wiring diagrams are indispensable tools when working on your vehicle’s PIN plug layout. They offer a visual representation of the wiring connections, making it easier to identify and rectify any issues.
Hall Effect Distributor or Single?
Depending on your setup, you may need to tailor your PIN plug layout for a Hall Effect Distributor or a single distributor configuration. Be sure to consult the appropriate wiring diagram for your specific needs.
Performance Enhancement: Toyota Twincam 20V
If you’re seeking a boost in performance, the Toyota Twincam 20V is an option worth exploring. With a power output of 120KW, it’s a formidable choice for street runs and spirited driving.
Addressing Common Issues
During your PIN plug layout optimization journey, you may encounter common issues that affect performance:
1. Fuel Mixture
Ensure your fuel mixture is in optimal condition. Any deviations can impact engine performance.
2. Dirty Throttle
A dirty throttle can impede airflow, affecting throttle response. Regular maintenance is key.
3. Vacuum Leaks
Detect and rectify vacuum leaks promptly to maintain engine efficiency.
Injector Considerations
If you’re working with a 16V 4AGE setup, it’s essential to inspect your injectors. Even if one rubber grommet is missing, the injectors should still function correctly. However, if your vehicle has been inactive for an extended period, there’s a risk of losing the programming.
Wiring Diagrams and Software
Accessing wiring diagrams and software is crucial for any tuning or optimization work. You can easily download these resources from the manufacturer’s website. Having the right tools at your disposal ensures a smooth optimization process.
Dictator Xmanagement: Taking Control
For those looking to take their performance to the next level, Dictator Xmanagement offers comprehensive control over your engine’s performance parameters. With a 38mm wastegate and various tuning options, it’s a favorite among enthusiasts.
Your Wiring Setup
To provide more specific guidance, it would be helpful to know the details of your wiring setup. How many wires are connected to your coils? A block diagram of the overall wiring system could shed light on potential optimizations.
Conclusion
Optimizing your PIN plug layout from the harness side is a critical step toward achieving peak performance from your vehicle. Whether you’re fine-tuning an existing setup or embarking on a performance build, careful consideration of wiring, components, and configurations will play a pivotal role in your success. Stay tuned for more insights into enhancing your automotive experience.
In the world of automotive performance, precision and expertise in PIN plug layout optimization can truly set you apart. Don’t hesitate to reach out for personalized advice based on your unique setup and requirements.